Notice
Recent Posts
Recent Comments
| 일 | 월 | 화 | 수 | 목 | 금 | 토 |
|---|---|---|---|---|---|---|
| 1 | 2 | 3 | 4 | 5 | 6 | |
| 7 | 8 | 9 | 10 | 11 | 12 | 13 |
| 14 | 15 | 16 | 17 | 18 | 19 | 20 |
| 21 | 22 | 23 | 24 | 25 | 26 | 27 |
| 28 | 29 | 30 | 31 |
Tags
- Algorithm
- 아두이노 소스
- c++
- html
- map
- priority_queue
- Array
- directx
- 수광 소자
- set
- Stack
- C언어
- 통계학
- 아두이노
- WinAPI
- Deque
- 아두이노 컴파일러
- arduino compiler
- 자료구조
- queue
- vector
- stl
- Arduino
- list
- 시스템프로그래밍
- 컴퓨터 그래픽스
- Visual Micro
- LineTracer
- 운영체제
- 라인트레이서
Archives
- Today
- Total
Kim's Programming
Arduino - Blink 아두이노 보드로 LED 깜빡거림을 구현해보자! 본문
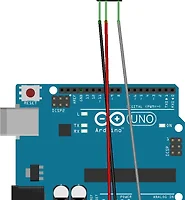
아두이노 보드를 이용하여 LED를 깜빡 거리게도 할 수 있습니다.
LED는 HIGH 신호에 불이 켜지고 LOW 신호에 불이 꺼집니다.
|
1
2
3
4
5
6
7
8
9
10
11
12
13
14
15
16
17
18
19
20
21
22
23
24
25
26
27
28
29 |
/*
Blink
Turns on an LED on for one second, then off for one second, repeatedly.
Most Arduinos have an on-board LED you can control. On the Uno and
Leonardo, it is attached to digital pin 13. If you're unsure what
pin the on-board LED is connected to on your Arduino model, check
the documentation at http://www.arduino.cc
This example code is in the public domain.
modified 8 May 2014
by Scott Fitzgerald
*/
// the setup function runs once when you press reset or power the board
void setup() {
// initialize digital pin 13 as an output.
pinMode(13, OUTPUT);
}
// the loop function runs over and over again forever
void loop() {
digitalWrite(13, HIGH); // turn the LED on (HIGH is the voltage level)
delay(1000); // wait for a second
digitalWrite(13, LOW); // turn the LED off by making the voltage LOW
delay(1000); // wait for a second
} |
cs |
1초간격으로 불이 껐다 켜지는 코드입니다.

아주 간단하게 위 처럼 LED를 끼워주시면 끝이 납니다
이 예제는 1초 간격으로 13번 포트에 LOW 와 HIGH를 쏴줍니다.
LED는 이에 반응하여 LOW일 떄 불이 꺼지고 HIGH일때 불이 켜지는것을 볼 수 있습니다.
'Arduino > 예제 이야기' 카테고리의 다른 글
| 아두이노 프로그래밍 기초(알아두면 좋은것!) (2) | 2015.07.09 |
|---|---|
| 아두이노 ADC 값을 읽어보자 (0) | 2015.07.02 |
| 아두이노 디지털, 아날로그 I/O (0) | 2015.06.30 |
| Visual Micro 시작(4/4) (0) | 2015.06.30 |
| Visual Micro 설정(3/4) (0) | 2015.06.30 |
'Arduino/예제 이야기' Related Articles
more